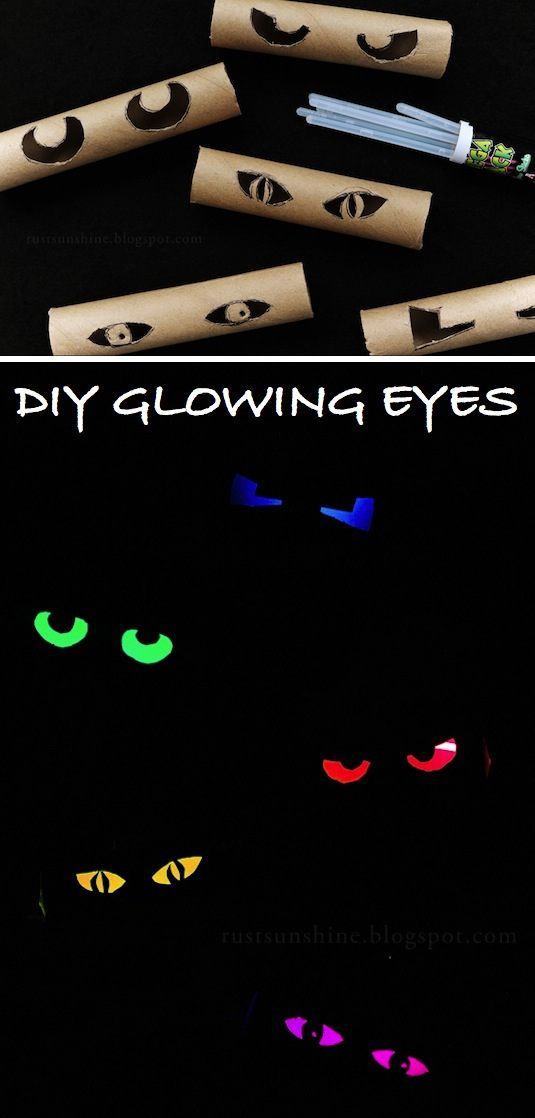
This project is super fun and easy, and can be quite an easy "scary" component to add to your outdoor decorations! (And best of all, it's cheap!) All it takes is a little bit of beforehand planning, and that's all! Materials:
There is an optional possibility of needing wax paper, but we'll have to see!!
Optional: colored pencil, or regular pencil, or even a pen
First take your toilet paper rolls (paper towel rolls will need to be cut in half). You will also want to cut out parts of your template eyes. If you aren't a visual person, you can use any sort of writing utensil to color in the areas of the template eyes that will have the light shining through them. Keep in mind that any areas that stretch from top to bottom will need to touch the outside of the eye in order to not get cut all the way out. Once you have decided which areas of the eyes will need to get cut out in order for the light to shine though, use a pair of scissors to cut those parts out of the template eyes.
After this, you can take each template eye and use the black marker to trace the pattern on to your paper towel or toilet paper rolls. Again, if you aren't a visual person, you can color them in so you can see which parts will need to be cut out. Next, using your razor, you can cut those colored pieces out to leave behind the holes that your glow stick light can shine though. As for the glow sticks, you can usually find tubes of them at Target or a craft store for only a dollar so don't get caught paying five dollars for 10 glow sticks!
To finish this project off, place the glow sticks inside (after cracking them to light up) and put some small pieces over the ends so the light doesn't shine out, and that's it! Glowing eyes to place in the bushes. Sometimes, you will be able to see the glow sticks too defined through the toilet paper rolls. In cases like this, you can take the glow sticks and wrap them in a small piece of wax paper to diffuse the color and no more glow stick pieces looking at you!
Yarn spiderwebs are another fun and easy decoration that can be used for the fun Halloween season. These look great in corners where they can pop out rather than just being laid flat against a wall. Materials
Yarn
Clear Tape
Fake spiders (can't have a spiderweb without spiders!)
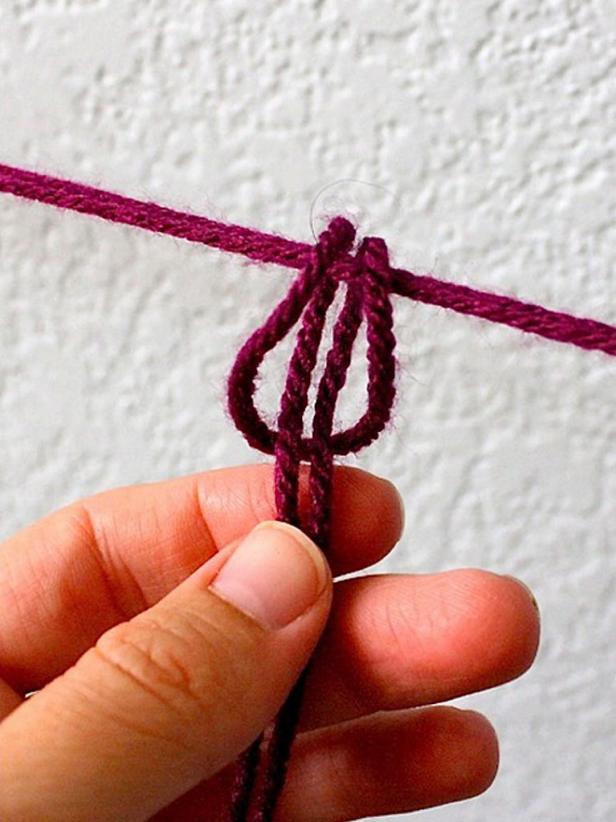
Begin by using two strands of yarn to make a large "X" and tape the edges to where you want your spiderweb to sit. Continue using double strands to add a few more lines across to make a large star typed shape across the area you want your spiderweb to be. Making the web rings are a little more difficult than the beginning part of the web. You need to begin by cutting a very long piece of yarn. Twice as long as you think you'll need. In order to tie the rings onto the original star shape, you will need to use a slip through type of knot rather than tying it on to each section. Here, you have the option of either putting the rings in concentric circles or in spirals outward. Use this knot to tie the yarn in its first location near the center of the circle, then go on to the next and the next section of the inner "star" to make the rings part of the web. I personally think it would be easier to to tie these in spirals outwards rather than concentric circles, but it's up to you! Stay tuned for the next DIY! Glowing eyes for your bushes. See you next time! (The next post should come later today!)
For today's entry towards the countdown to Halloween, we will learn how to make illuminated ghost garlands!! These are a really fun way to spruce up a string of small lantern lights and make them Halloween festive!
Materials:
Strand of white lantern lights
White cotton fabric (about 2 square yards)
Write string (easy to find at craft stores; thread may work as well)
Scissors
Black marker or sharpie
Begin by cutting the fabric into 14 inch squares, one for each of the lanterns in your strand. After this, take each square and make a valley fold (line up one corner with the corner on the opposite side). This should form a triangle shape. Folding in half again should give you another triangle shape with one of the tips being the center of your square. Cut off that tip of the triangle in order to make a small hole in the center of your square fabric. Repeat with each of your squares.
Carefully remove a lantern from its light, and slide the light though the hole in your fabric square. Once you replace the lantern, it's a simple matter of bringing the fabric over the lantern and tying the string underneath in order to form the ghost shape. (Again, make sure to repeat for each of the lanterns in your strand.)
Finish by using your black marker to draw a ghostly face on it and voila!! A super easy strand of ghost garland completed! Hang these cute decorations inside or out, either way, it makes a fun decoration that can be enjoyed in the day time or the night.
Come back in just two more short days to enjoy number nine in our countdown to Halloween: Yarn Spiderwebs!! Wow, we'll be at number nine already, how time does fly! Be sure to begin gathering some materials for Halloween!
Pumpkin luminaries are a fun cute way to have your own mason jar "jack-o-lantern" that will definitely last longer than any pumpkin you buy (but don't go pumpkin-less either!). These fun and easy decoration pieces will look great around your home.
Materials
Mason jars (smooth, not textured)
Mod podge
Orange tissue paper
Black construction paper
Scissors
Adhesive
Sponge or foam applicator
Optional Materials
Green ribbon
Floral leaf pick
First things first. Cut your tissue paper into strips only about an inch wide or so (it doesn't have to be exact, just approximate) and make sure they're about the right length to run from just under the lip where the lid would screw on the mason jar to the bottom of the jar (but not underneath). Brush that mod podge onto the mason jar, lay your strips on vertically (letting them overlap some). Do note that usually this step is easiest when the jar is upside down.
After this, simply cut out your pumpkin "face" and adhere it to your pumpkin! For the optional pieces, you can tie a green ribbon around the lid part of the jar and stick in a leaf flower pick in order to give a "stem and leaf" to your pumpkin.
For more great DIY Halloween decorations, stay tuned. Another post is coming in just two short days: the Illuminated Ghost Garland!!
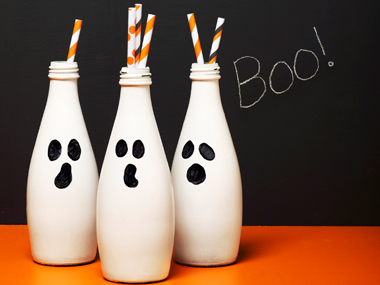
Boo Bottles! These little decorated bottles are definitely cute little decorations that can be great centerpieces.
Materials
Glass bottles
White spray paint
Black markers
Something to put inside (paper straws, "dead" flowers, etc.)
These super cute Boo Bottles are also super easy to make! You can raid your recyclables, or save up if you have enough time before Halloween (and of course if you can, you can always ask relatives to help you save a couple). Before you start, always remember to remove any labels and lids from your bottles (glass usually works best). Next, all you need to do is spray paint these bottles while and draw some cute faces on them using black markers. Place whatever you'd like inside to spruce it up. Place it on your table as a centerpiece or anywhere else as a cute Halloween decoration!
Stay tuned for our next fun DIY Halloween craft: Pumpkin Luminaries!!
We are now officially three days in to the month of October! October is a super awesome month! It's time for fall colors to come and the fun of Halloween, and of course, my birthday *wink wink* :)
Halloween can be a very exciting time for everyone, young and Jung (because there is no such thing as old of course). For the little kids, it means dressing up, eating candy, and being able to talk about people's guts and brains without it sounding weird. For the bigger kids however, it means dressing in a terrifying costume, an excuse to eat too much candy, and being able to see or make some scary awesome decorations.
If you love decorating (like I do), then the holiday season is such a great time, and Halloween is the holiday to kick it off! While I understand the tradition behind Halloween, I have always loved all things scary and so I LOVE all the scary that can come with Halloween.
Today begins our countdown to Halloween! Basically, today, I will just start with the "small stuff." Little decoration pieces that can add a fun dimension to your scary setup (if you're planning one this year). Don't worry, these DIY's will get better, but seeing as this is the first of the countdown, I thought it would be a great place to put the "small stuff."
Fog Machines: Fog machines can get a little bit pricey for the fancy ones, but you can get a decent deal if you get them on sale at Party City or something like that. These little fog makers can add a really fun dimension to a scary scene. However, as a little side note, it's usually best to use these outside!
Strobe Lights: In case you don't already know, strobe lights are lights that flash on and off really quickly. They can be quite irritating to the eyes on a normal day, but on Halloween, this fast blinking light can play tricks on the brain, especially when there's a heightened fear factor. Paired with a fog machine, its even MORE awesome!
Black Light: Black lights can accentuate specific props and can add another fun dimension to your scare scene. Black lights don't always work, but they can do a great job at showing your props better if they are the right colors or are painted with the right colors.
Blood Splatter: Super easy to do, use either fake blood or different colored red paints (that look like blood) and dip a brush in. While you can use it to paint fake blood on anything you'd like, it's also great to spread around some blood splatter. Put extra "blood" on the brush and swing it at the place you'd like your splatter for some thicker drops. Then, with less "blood" on your brush, use your thumb to pull back on the bristles and fling some smaller drops to add a little more realistic dimension and that's all it takes! Blood splatter. :)
Today was just a few small things to help accent your scary scene, but to come we have some fun indoor props as well as some awesome looking and scary outdoor props! Come back in two days for the number 12 Halloween DIY decoration: Boo Bottles!
Watch this video here. It can really be an eye opener. Especially in countries where the "Western" ideals have been adopted. I watched this as an assignment for school last semester, and it hit right on the nail for me. It helped put into words so many of the things that I have felt about our current school system. It does a disservice to SO many children, and makes them feel that they don't have what it takes to make a difference in the world. I truly believe with all my heart that many of these children not only have what it takes to do what they want with their lives, but are almost destined to do so. They are just made to feel like they can't because of how our system is run.
The biggest problem I find myself thinking about after watching this video is that now that we've recognized this problem, I don't really have a great idea for how to fix it. I'm not sure anyone does yet. Though I refuse to believe that this is the way it has to be, I have yet to be able to find a way to have a school system that benefits more children. Of course, living with a school system that has been designed this way for all my life may just have made it difficult for me to imagine schools in any other way. Maybe that's the whole problem: everyone is so stuck on our current system, that no one has yet been able to think far enough outside the box to make a radical change.
What are you're thoughts on this subject? What sort of changes can we make to our school system in order to help decrease the number of children that are put aside by our current school system? What disservice has our current system done you or someone you know? Comment below. :)
And don't forget! Starting tomorrow we begin our countdown to Halloween! Thirteen posts with DIY decorating tips and ideas! All starting tomorrow. :)